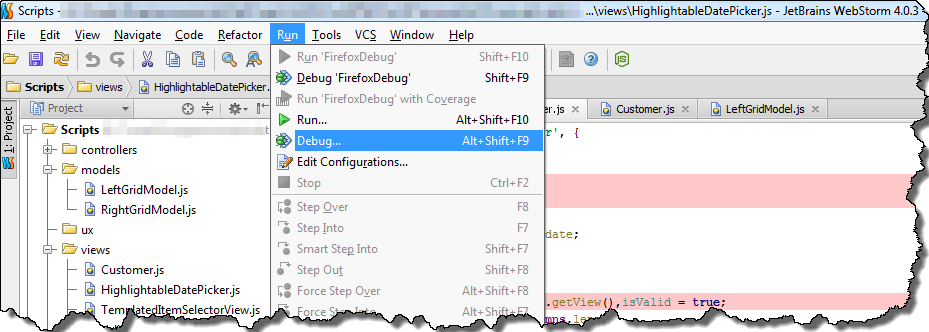
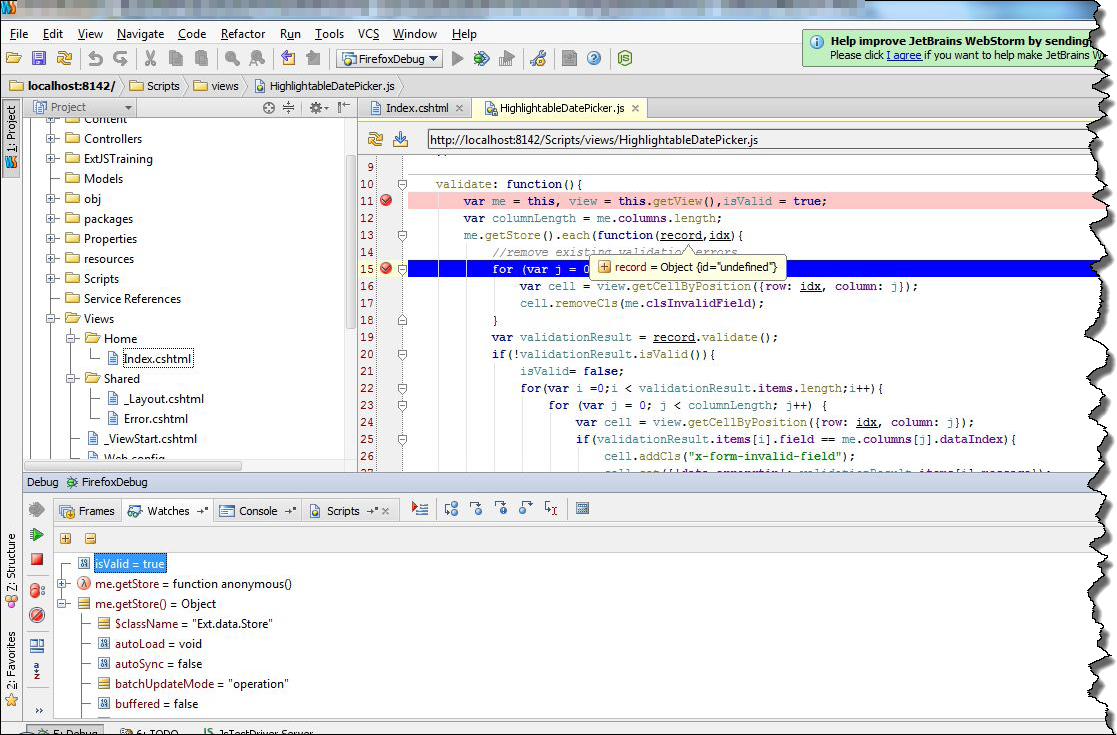
I’ve been working with ASP .NET combined with Extjs for about half a year. All this time for debugging I’ve been using Firebug in Firefox, or Developer Tools in Chrome. Although both of these tools are great, I decided to try to use build in WebStorm debugger. According to documentation this debugger should work with Firefox as well as with Chrome. However I’ve only managed to run it correctly with Firefox. In order to start debugging session, we have to make some preparation. Let’s choose option Debug… from Run menu
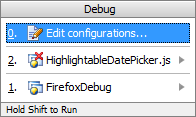
In opened small window, we have to choose first option – Edit configurations…
In the next window we can create new debugging profile. In order to do that, click on + sign in the left upper corner of window, then choose JavascriptDebug and Remote option.

This is the final step of the configuration. The most important fields in configuration window is URL to open field, in which we specify adress of our site. In my case it is localhost on port 8142. We also have to specify mapping from remote host direcotry structure to our directory structure. Sample configuration is presented below
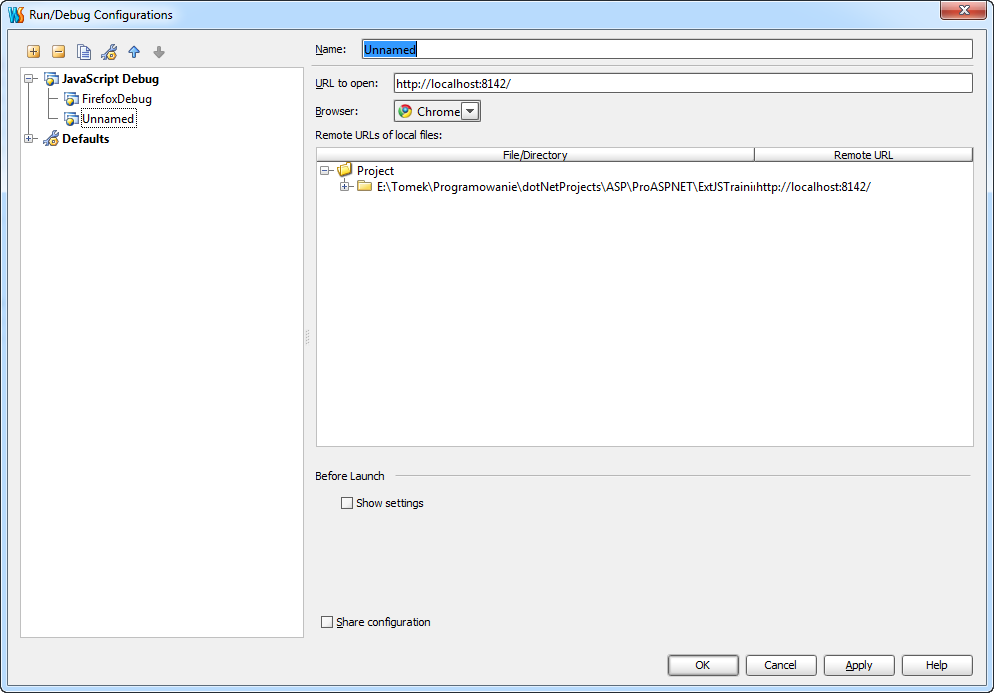
We also have a possibility to choose browser in which our site will be displayed. I decided to choose Firefox because of the fact, that WebStorm debugger had some problems with Chrome. Now we can try to run debugging session by pressing ALT+F9. If we choose Firefox, in the very first time we run debugger, we will see this window

which informs us that WebStorm must install extension to Firefox. Clicking OK button starts Firefox
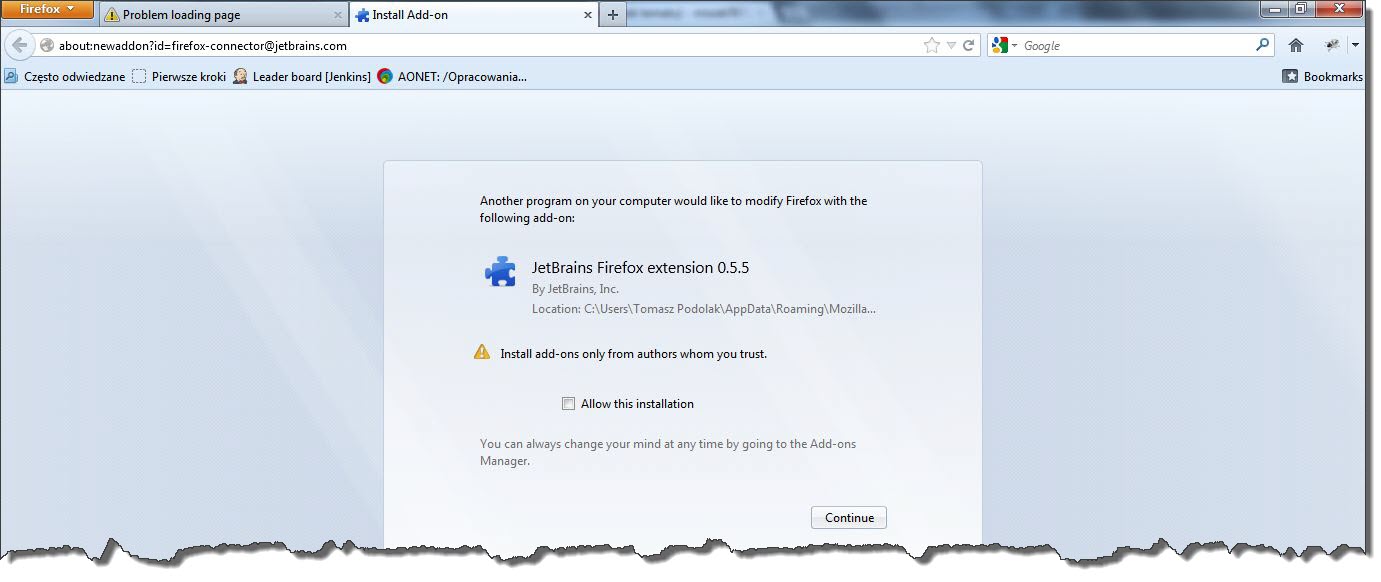
which warns us that external program is trying to install extension. Clicking continue button will finish configuration process, and WebStorm will successfully attach debugger.
Month: September 2012
Extjs 4.1.1 – how to fix row resize phenomena
Recently I’ve encountered annoying problem with extjs grid. After hiding columns with long wrapped text, height of rows was dramatically increased. Here are some screens presenting this particular situation. Grid with all columns shown;

and grid with one column hidden

The code responsible for rendering this grid is shown below
|
1 |
.x-grid-cell-inner { white-space: normal; } |
|
1 2 3 4 5 6 7 8 9 10 11 12 13 14 15 16 17 18 19 20 21 22 23 24 25 26 27 28 29 30 31 32 33 34 35 36 37 38 39 40 41 42 43 44 45 46 47 48 49 50 |
Ext.onReady(function () { Ext.QuickTips.init(); var store = Ext.create('Ext.data.Store', { fields: ['Id', 'firstname', 'lastname'], data: { items: [{ Id: 1, firstname: 'some long text some long text some long text some long text some long text some long text some long text some long text some long textareasome long textareasome long textarea', lastname: 'Smith' },{ Id: 1, firstname: 'Mat' },{ Id: 1, firstname: 'Kate', lastname: 'Smith' },{ Id: 1, firstname: 'Richard', lastname: 'Smith' }] }, proxy: { type: 'memory', reader: { type: 'json', root: 'items' } } }); var visible = true; var grid = Ext.create('Ext.grid.Panel', { store: store, renderTo: Ext.getBody(), columns: [ { text: 'Id', dataIndex: 'Id' }, { text: 'First name', dataIndex: 'firstname' }, { text: 'Last name', dataIndex: 'lastname' }]}); Ext.create('Ext.button.Button', { text: 'click', renderTo: Ext.getBody(), handler: function() { visible = !visible; grid.columns[1].setVisible(visible); grid.validate(); } }); }); |
After some digging, it turned out that Extjs hides columns by setting their width to 0px. In order to solve this problem and preverse text wrap in cells, I implemented small workaround. Let’s start from creating CSS class which disables word wrapping in grid cells.
|
1 |
.noWrap .x-grid-cell-inner {white-space: nowrap;} |
Next, we have to start listening for two events
- columnhide
- columnshow
In handlers of these events, we have to modify tdCls property of hidden column – add noWrap class, if column is hidden and delete this class otherwise.
|
1 2 3 4 5 6 7 8 9 10 11 |
grid.headerCt.on({ columnhide: function (headerCt, column) { column.tdCls = "noWrap"; this.getView().refresh(); }, columnshow: function (headerCt, column) { column.tdCls = ""; this.getView().refresh(); }, scope: grid }); |
From now hiding and showing columns works fine

Entire code listing is presented below
|
1 2 3 4 5 6 7 8 9 10 11 12 13 14 15 16 17 18 19 20 21 22 23 24 25 26 27 28 29 30 31 32 33 34 35 36 37 38 39 40 41 42 43 44 45 46 47 48 49 50 51 52 53 54 55 56 57 58 59 60 61 62 |
Ext.onReady(function () { Ext.QuickTips.init(); var store = Ext.create('Ext.data.Store', { fields: ['Id', 'firstname', 'lastname'], data: { items: [{ Id: 1, firstname: 'some long text some long text some long text some long text some long text some long text some long text some long text some long textareasome long textareasome long textarea', lastname: 'Smith' },{ Id: 1, firstname: 'Mat' },{ Id: 1, firstname: 'Kate', lastname: 'Smith' },{ Id: 1, firstname: 'Richard', lastname: 'Smith' }] }, proxy: { type: 'memory', reader: { type: 'json', root: 'items' } } }); var visible = true; var grid = Ext.create('Ext.grid.Panel', { store: store, renderTo: Ext.getBody(), columns: [ { text: 'Id', dataIndex: 'Id' }, { text: 'First name', dataIndex: 'firstname' }, { text: 'Last name', dataIndex: 'lastname' }]}); grid.headerCt.on({ columnhide: function (headerCt, column) { column.tdCls = "noWrap"; this.getView().refresh(); }, columnshow: function (headerCt, column) { column.tdCls = ""; this.getView().refresh(); }, scope: grid }); Ext.create('Ext.button.Button', { text: 'click', renderTo: Ext.getBody(), handler: function() { visible = !visible; grid.columns[1].setVisible(visible); grid.validate(); } }); }); |
Extjs 4.1.1 – validatable grid
In this post I will present a simple plugin to Ext.panel.Grid which displays validation errors on a grid. The validation mechanism is based on the model validation – useful feature of Extjs framework. Let’s start from creating a simple model:
|
1 2 3 4 5 6 7 8 9 |
Ext.define('CustomerModel', { extend: 'Ext.data.Model', fields: [ {name: 'id', type: 'int'}, { name: 'lastname', type: 'string' }, {name: 'firstname',type:'string'} ], validations: [{type: 'presence', field: 'lastname', message:'Required field'}] }); |
As we can see, this model has a validation field where we can define a validation mechanism for every field in our model. In this example the lastname field is required, I use build in Extjs validator of the presence type. More build-in validation types might be found here. Of course, it is possible to define custom validation types, simple example can be found on StackoverflowHaving defined model validation, let’s create ValidatableGridplugin. The main function of ValidatableGrid plugin is function called validate which is attached to grid component. This function looks this way;
|
1 2 3 4 5 6 7 8 9 10 11 12 13 14 15 16 17 18 19 20 21 22 23 24 25 |
validate: function(){ var me = this, view = this.getView(),isValid = true; var columnLength = me.columns.length; me.getStore().each(function(record,idx){ //remove existing validation errors for (var j = 0; j < columnLength; j++) { var cell = view.getCellByPosition({row: idx, column: j}); cell.removeCls(me.clsInvalidField); } var validationResult = record.validate(); if(!validationResult.isValid()){ isValid= false; for(var i =0;i < validationResult.items.length;i++){ for (var j = 0; j < columnLength; j++) { var cell = view.getCellByPosition({row: idx, column: j}); if(validationResult.items[i].field == me.columns[j].dataIndex){ cell.addCls("x-form-invalid-field"); cell.set({'data-errorqtip': validationResult.items[i].message}); } } } } }) return isValid; } |
This function iterates through every model in grid’s store and runs validation method. As a result, we get a validationResult object which holds information about errors of model. This object has a function isValid which returns true if there is no errors or false otherwise. Having checked the model, we have to show errors on the grid. In order to do that, we have to find a cell, in which invalid field is displayed using getCellByPosition function. In the last step, we only have to modify CSS classes of cell. That is why, I added x-form-invalid-field class to show red line in cell and also data-errorqtip class to show validation error tooltip. The entire listing looks this way;
|
1 2 3 4 5 6 7 8 9 10 11 12 13 14 15 16 17 18 19 20 21 22 23 24 25 26 27 28 29 30 31 32 33 34 |
Ext.define('ValidatableGrid', { grid:null, init: function (grid) { var me = this; me.grid = grid; me.grid.validate = me.validate; }, validate: function(){ var me = this, view = this.getView(),isValid = true; var columnLength = me.columns.length; me.getStore().each(function(record,idx){ //remove existing validation errors for (var j = 0; j < columnLength; j++) { var cell = view.getCellByPosition({row: idx, column: j}); cell.removeCls(me.clsInvalidField); } var validationResult = record.validate(); if(!validationResult.isValid()){ isValid= false; for(var i =0;i < validationResult.items.length;i++){ for (var j = 0; j < columnLength; j++) { var cell = view.getCellByPosition({row: idx, column: j}); if(validationResult.items[i].field == me.columns[j].dataIndex){ cell.addCls("x-form-invalid-field"); cell.set({'data-errorqtip': validationResult.items[i].message}); } } } } }) return isValid; } }) |
here is example of usage;
|
1 2 3 4 5 6 7 8 9 10 11 12 13 14 15 16 17 18 19 20 21 22 23 24 25 26 27 28 29 30 31 32 |
Ext.QuickTips.init(); var store = Ext.create('Ext.data.Store', { model: 'CustomerModel' }); store.add([{ id: 1, firstname: 'John' }, { id: 1, firstname: 'Mat' }, { id: 1, firstname: 'Kate', lastname: 'Smith' }, { id: 1, firstname: 'Richard', lastname: 'Smith' }, { id: 1, firstname: 'Nick' }]); vGrid = Ext.create('Ext.grid.Panel', { store: store, plugins: [Ext.create('ValidatableGrid')], columns: [ { text: 'Id', dataIndex: 'id' }, { text: 'First name', dataIndex: 'firstname' }, { text: 'Last name', dataIndex: 'lastname' }]}); vGrid.validate(); |
and the result

Source code for this post can be found here
Extjs 4.1.1 – multiselectable datepicker as plugin
A couple of weeks ago I wrote a post about creating a mutiselectable datepicker. The idea of creating this component was to use the object inheritance. Today, I would like to show how to create a multiselectable datepicker as a plugin to Ext.date.Picker. The code responsible for selecting dates is almost the same, the only thing which must be changed is the component initialization and access to the datepicker component. In order to make a plugin to any Ext.Component class, you must implement the init method which takes as argument a reference to the component – so let’s change the existing code to meet this requirement. We need to rename initComponent function to init. In addition to, we should delete the extend property from our code. After these changes the init function looks like this:
|
1 2 3 4 5 6 7 |
init:function(datePicker){ var me = this; me.datePicker = datePicker; // me.callParent(arguments); me.datePicker.on('select',me.handleSelectionChanged,me); me.datePicker.on('afterrender',me.higlighDates,me); } |
Please notice, that the init function takes as an argument the datepicker component – and from now on this is our only way to access this component. The rest of the code also requires some modifications – it’s necessary to change all references to the datepicker (from the variable me to me.datePicker). The entire code listing is presented below.
|
1 2 3 4 5 6 7 8 9 10 11 12 13 14 15 16 17 18 19 20 21 22 23 24 25 26 27 28 29 30 31 32 33 34 35 36 37 |
Ext.define('Multiselect', { selectedDates : {}, clsHigligthClass :'x-datepicker-selected', datePicker:null, init:function(datePicker){ var me = this; me.datePicker = datePicker; // me.callParent(arguments); me.datePicker.on('select',me.handleSelectionChanged,me); me.datePicker.on('afterrender',me.higlighDates,me); }, higlighDates: function(){ var me = this; if(!me.datePicker.cells) return; me.datePicker.cells.each(function(item){ var date = new Date(item.dom.firstChild.dateValue).toDateString(); if(me.selectedDates[date]){ if(item.getAttribute('class').indexOf(me.clsHigligthClass)=== -1){ item.addCls(me.clsHigligthClass) } }else{ item.removeCls(me.clsHigligthClass); } }) }, handleSelectionChanged:function(cmp,date){ var me = this; if(me.selectedDates[date.toDateString()]) delete me.selectedDates[date.toDateString()] else me.selectedDates[date.toDateString()] = date; me.higlighDates(); } }) |
Here is example of usage;
|
1 2 3 |
var picker = Ext.create('Ext.picker.Date', { plugins: [Ext.create('Multiselect')] }); |
and the result

Source code for this post can be found here