The majority of the libraries developers use in their projects these days are open source. So in case something crashes inside third party library or you just want to know how it works, it is possible to get the PDB files from Microsoft Symbols Servers and debug it. If for some reasons PDB cannot be found on the servers, you can always grab the source code from GitHub and add to your project manually. Unfortunately when you use commercial libraries, it is impossible to do any of the previous steps. Luckily with Resharper you are able to generate PDB files from assembly and use it later in Visual Studio to debug it.
Let’s assume we would like to generate PDB files for EntityFramework. First of all, we have to locate EntityFramework assembly in Assembly Explorer. Go to Solution Explorer, RMB click on assembly you are interested in and select View in Assembly Explorer.

In Assembly Explorer once again RMB click on EntityFramework and select “Generate Pdb…”

In the opened window, select the destination folder for the files.

Once you click “Generate“, Resharper will process the assembly and generate PDBs.

Once the files are generated we have to tell Visual Studio to use them. In order to do that, run the app and stop the execution with some breakpoint, then go to Debug->Windows-> Modules, locate EntityFramework.dll, click it with RMB, select “Load Symbols” and choose file(s) generated by Resharper.

A this point we have PDB files ready but we are not able to set any breakpoint as we don’t have source code of EntityFramework. Fortunately Resharper once again saves the day as it is able to navigate to decompiled sources. Just make sure that your settings (Resharper->Options->External Sources) are the same as in the picture below

and you can navigate to external libraries’ source code just like they were in your project. The very last step is to disable “Enable Just My Code” option in Tools->Options->Debugging->General

and from now on you can debug the external library

Resharper
Resharper – localizable string literals
Everyone who has ever tried to create multilingual application knows, that this is very tedious task. The most repetitive work is usually moving hard-coded strings to resource files. Fortunately with Resharper this is definitelly less painfull than usuall.
In order to point out localizable parts of application , it is necessary to decorate classes with System.ComponentModel.LocalizableAttribute.  However, usually we want to localize an entire program, so more universal solution is to set appropriate project configuration in properties window. To bring up this window, select project file and then press F4 button.

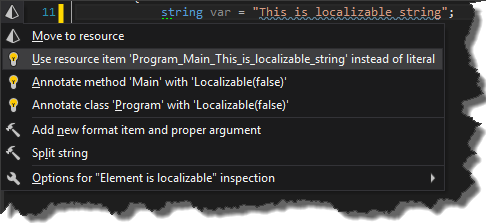
From now on, Resharper shows warnings indicating that our hard-coded strings might be moved to resource file. Pressing ALT+ENTER on these strings will bring up the context menu action, where new option – “Move to resource” is available.
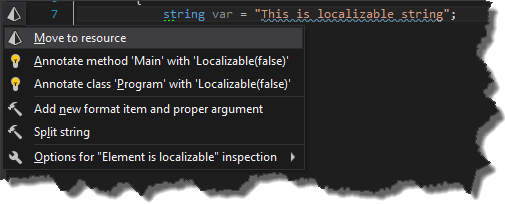
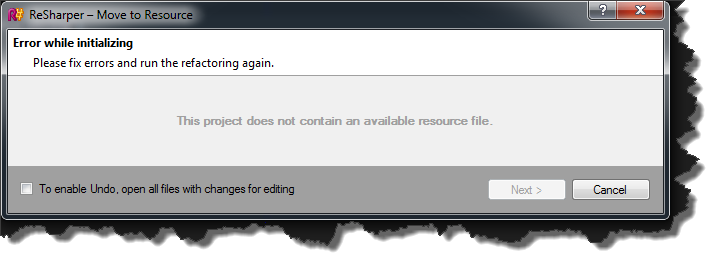
Choosing this option will bring up the “Move to Resource” window. However if we do not have any resource files in our project, we will get this message.
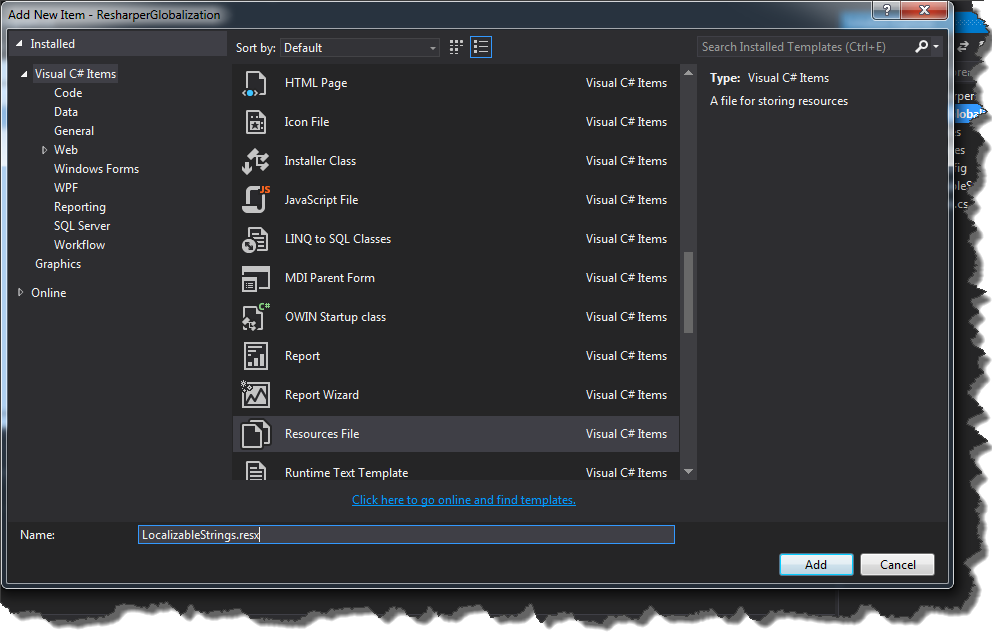
In order to create these files, right click on project and choose Add->New Item. Now, select Resource.resx file and name it for example LocalizableStrings.resx.
In this resource file we will store values for our “default language”. Supporting more languages require us to create additional LocalizableString files with appropriate LETF tags suffixes.

Now, we are able to move our hard-coded string to resource files.
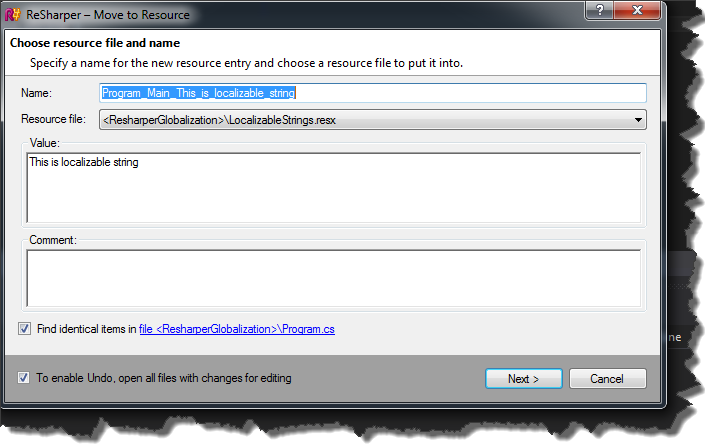
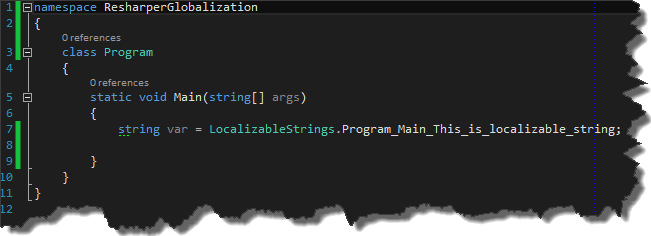
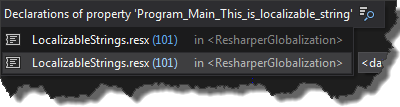
By default Resharper adds hard-coded strings to default resource file, so we have to specify values for localizable string for other languages. In order to do that, first navigate to resource entry in LocalizableStrings.resx file by holding CTRL and clicking property “Program_Main_This_is_localizable_string”
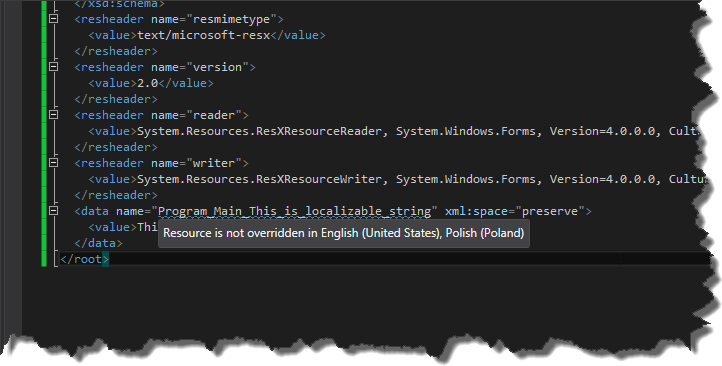
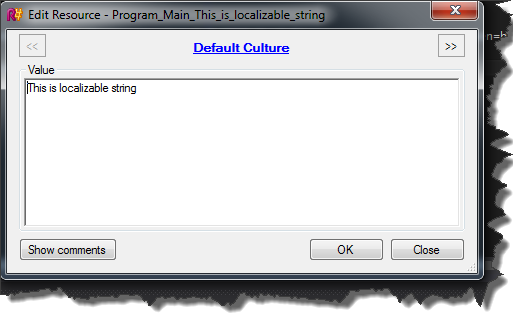
and then press ALT+ENTER and choose “Override ‘PropertyName…'”. This operation brings up “Edit Resource” window where You can easily navigate between resource files and update given resource property
Resharper not only is able to move strings to resource files but also can use existing ones. This basically means that if we use hard-coded string which already has been added to resource file, Resharper will suggest to use predefined resource
Resharper – “Go to Everything”
In Resharper 8 JetBrains introduced new command called “Go to Everything”. You can use it by hitting the CTRL + N keys (CTRL + T with Visual Studio keyboard shortcuts layout) This command is basically combination of three features known from previous versions of Resharper, namely: “Go to Class”, “Go to Type” and “Go to Symbol”. Most common usage of this functionality is just to search classes, properties or functions.
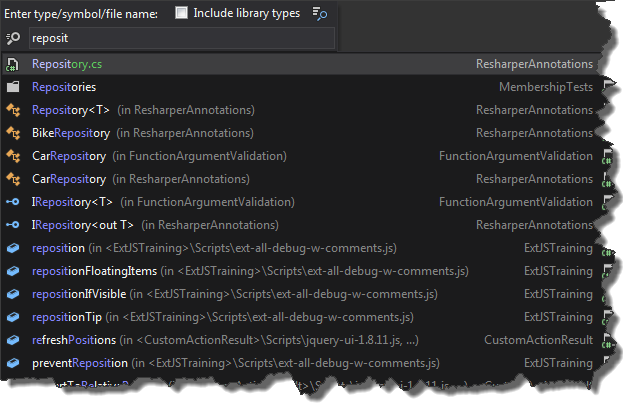
However not everyone knows, that we can narrow down search criteria and find methods or properties in given class

What is even more interesting, is the fact that it is possible to go to specific line in searched type

Resharper – annotation attributes
1. Introduction
I think one of the most important features of Resharper is on-the-fly code quality analysis. Basically, every time Resharper finds possible pitfall in code, it indicates this with appropriate warning. The most common warning is “Possible System.NullReferenceException”. You can easily reproduce it by writing this code
|
1 2 3 |
List<object> objlList = new List<object>( ); var result = objlList.SingleOrDefault( ); Console.WriteLine( result.GetHashCode( ) ); |

As you can see R# is able to figure out, that LINQ SingleOrDefault function can return null. However there is no warning if we try to do something like that
|
1 2 3 4 5 6 7 8 9 10 |
private static void DisplayHashCode() { var result = Foo(); Console.WriteLine( result.GetHashCode( ) ); } private static object Foo() { return null; } |
So it got me thinking, how Resharper recognizes whether or whether not to show warnings. It turned out, that it uses annotation attributes, which describe behavior of functions, properties, classes and interfaces.
2. Source code annotations
In order to use these attributes we have to place them in our project. First of all, let’s create Annotation.cs file and then copy default implementation of annotations into this file. The default implementation can be found in Code annotation option (Resharper->Options->Code Inspections->Code Annotations) under the button “Copy default implementation to clipboard”.


From now on we can decorate our functions with e.g. CanBeNull attribute
|
1 2 3 4 5 6 7 8 9 10 11 |
private static void DisplayHashCode() { var result = Foo(); Console.WriteLine( result.GetHashCode( ) ); } [CanBeNull] private static object Foo() { return null; } |
and we will get warning if necessary

Of course there are a lot more of attributes to use. My favorites are:
- StringFormatMethodAttribute

- PathReferenceAttribute

- NotifyPropertyChangedInvocatorAttribute

3. External code annotations
In case we do not have access to source code, we still are able to use annotation attributes. However we have to define annotations in xml configuration file. Let’s say we want to decorate NHibernte’s SaveOrUpdate function with NotNullAttribute. First of all we have to create xml file with appropriate declaration (This is standard XML Document Comment file. You can read specification here and here.)
|
1 2 3 4 5 6 7 |
<assembly name="NHibernate"> <member name="M:NHibernate.ISession.SaveOrUpdate(System.Object)"> <parameter name="obj"> <attribute ctor="M:JetBrains.Annotations.NotNullAttribute.#ctor" /> </parameter> </member> </assembly> |
Having prepared configuration file, we need to place it in appropriate location in order for Resharper to use it. It can be stored in
- [ReSharper install directory]\Bin\ExternalAnnotations\[Assembly name].xml
- [ReSharper install directory]\Bin\ExternalAnnotations\[Assembly name][Any name].xml.
So in my case the location is
|
1 |
C:\Program Files (x86)\JetBrains\ReSharper\v8.1\Bin\ExternalAnnotations\NHibernateNHibernate.xml |
After restarting Visual Studio, Resharper should load the file and show warning messages.

4. Generating initial XML annotation files
Creating xml annotation file for large library is very tedious task, fortunately Resharper have a hidden feature which can help us with generating initial xml file. First of all we have to run Visual Studio with /ReSharper.Internal parameter. In this mode we have an access to undocumented/hidden features of Resharper. Now, in the “Resharper” menu there is one additional menu item – Internal, where You can find Annotator submenu in which resides Annotate item.

Now You can specify for which dll Resharper should generate xml annotation file.

and after a while You should get complete xml declaration.

Please bear in mind, that Annotator is not official R# feature, so there is no guarantee that generating annotation files will succeed. Source code for this post can be found here
Resharper – custom snippet
I think all Resharper users are familiar with snippets. Resharper’s snippet basically generates a piece of code, which can be easily customised on the fly. All you have to do is to press TAB, and you can change names of auto-generated variables etc. Today, I decided to write my own snippet, which would make writing unit tests easier. In general, all my unit test methods looks like this
|
1 2 3 4 5 |
[Test] public void MethodName_Scenario_ExpectedResult_Test() { //test logic goes in here } |
So let’s write a snippet which will generate a method with this signature. In order to do this, let’s choose a Templates Explorer… from the Resharper’s menu.

In the opened window, click on the plus sign and a new tab should appear.

Let’s name our snippet test and paste the following code into the main editor.
|
1 2 3 4 5 |
[Test] public void MethodName_Scenario_ExpectedResult_Test() { } |
Now, we’ve created a simplified snippet for generating our test function signature. However, this snippet is not really useful as its user cannot navigate through the underscored chunks. In order to employ the Resharper’s navigation features, we have to slightly modify our snippet. Let’s replace the previous code with this one:
|
1 2 3 4 5 |
[Test] public void $MethodName$_$Scenario$_$ExpectedResult$_Test() { $END$ } |
Please notice that now some parts of the method’s name are written between dollar signs. Thanks to this syntax, the Resharper is able to iterate over these parts and lets us change their names on the fly. $END$ is a special control sequence which tells the Resharper where to stop iteration over variables. At this moment, our snippet is fully functional and we can use it by typing the word test and hitting the TAB button.

